Eight Pro Tips for Using Google Tag Manager
This post is an update to the original, first published on 2/1/2017.
Want to become a better GTM practitioner? Read on for eight pro tips you can use with any GTM container.
Note: This post will not show you some cool new way to track videos or whatever. Tons of bloggers have covered that. This post is more about the philosophy behind your approach to GTM.
I’ve learned these tricks during several years of working in a multitude of GTM containers. Are these “best practices”? Who knows! But I can say with certainty that they have helped me maintain my sanity and work more quickly in GTM.
The pro tips below deliver the most value when you work across multiple containers, but most are equally valid when you work with just one.
Pro Tip 1 – Use Workspaces to keep your changes isolated
More than once, I’ve gone into a GTM container, made a bunch of changes, tested them, and was ready to publish, only to realize that someone else had been in the container also making changes. Aargh! Obviously, I can’t publish someone else’s changes; I don’t know what they are, they might not be helpful, or they may not be ready to launch.
Now, the first thing I do is check the Overview Screen. If it’s empty, as in the screenshot below, great – I can start my work and not worry about other people’s work.
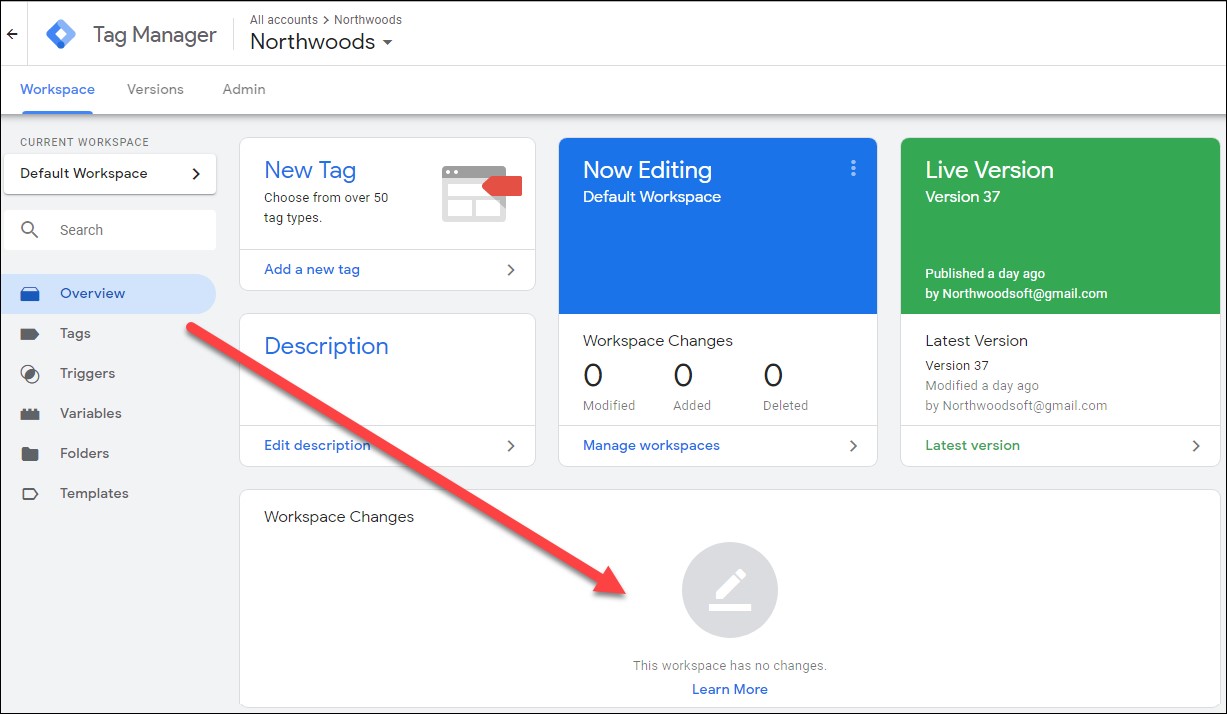
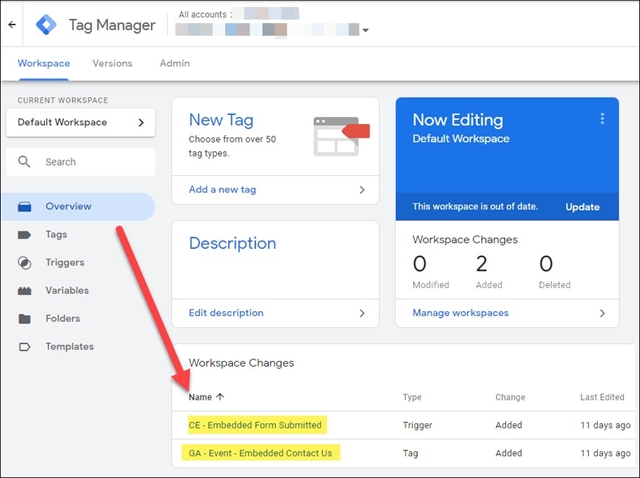
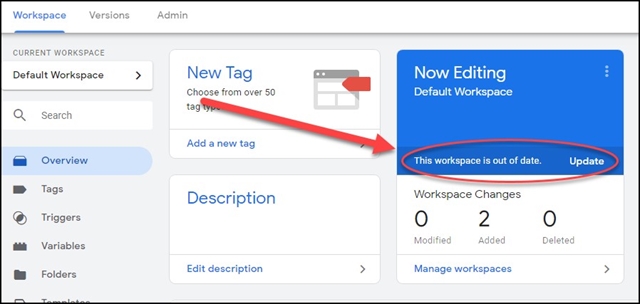
What if it’s not empty? Here’s a container with a tag and trigger someone added 11 days ago. Do they work? Are they good to go? I have no idea, but I definitely want to work independently of them.
That’s where workspaces come in. Think of workspaces as your own private branch of the GTM container. You can make changes in that workspace and publish them without affecting what anybody else is doing in another workspace.
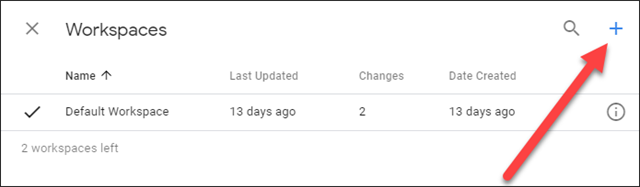
Creating your own workspace
Click on Manage Workspaces.
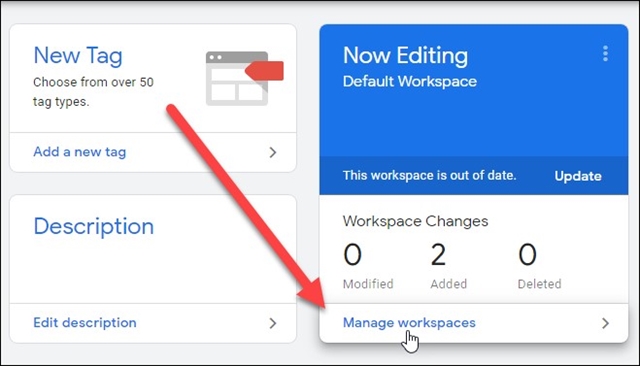
Click on the + sign.
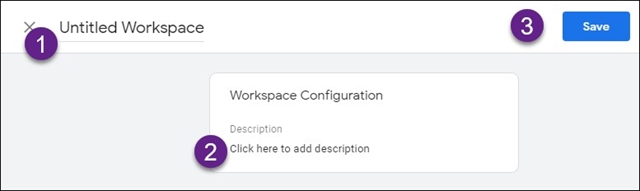
Give your workspace:
- A descriptive name.
- A good description of what you’ll be doing.
- Save the workspace.
Now you can make all the changes you want in your own private workspace, then publish without worrying about anybody else’s changes. Once you publish, that workspace will disappear.
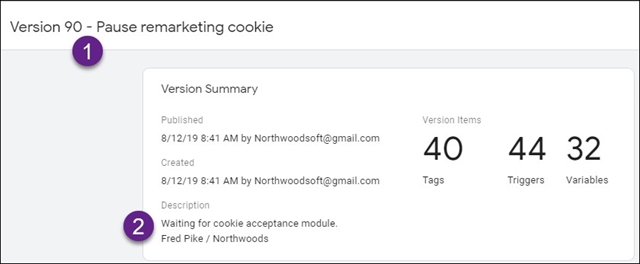
Why labor over the name and description of the workspace? Because when you publish the workspace, whatever you have there will become the default name and description of that version of the GTM container.
Here’s where the workspace name and description show up in the published version:
Merging Workspaces
Once you’ve published your workspace, the GTM live version is now newer than any other workspace. You may have noticed the “This workspace is out of date” warning in some of the prior screenshots:
Or you may see this message in the Overview screen:
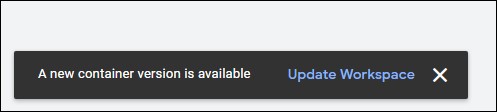
Either way, click on the Update or Update Workspace link.
If there are no conflicts, go ahead and Update.
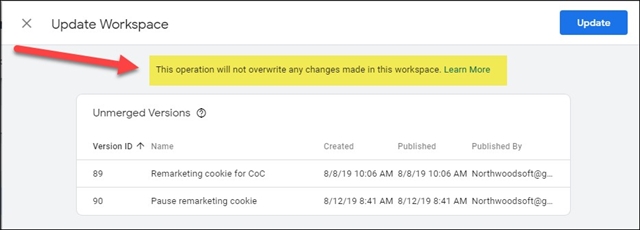
If conflicts exist, GTM will point them out. You and/or the workspace owner will have to figure out how to deal with them.
Pro Tip 2 – Use the Overview page to quickly find your changes
I love the Overview page – it’s a real time saver.
Many of the containers I work with have many tags, triggers, and variables. This one has 76 tags and 57 triggers:


Large numbers of tags and triggers can make your new tags and triggers – the ones you’re currently working on – hard to find. The Overview page shows all the new/changed tags, triggers, and variables in a handy list. Sweet!

Pro Tip 3 – Store both the GTM Container ID AND the Version ID as custom dimensions
Here’s a tiny tweak to a great set-up tip from Simo Ahava’s “13 useful custom dimensions for GA.” I use six of the 13, including tracking the GTM Container ID – but I also add the GTM Version ID, which has proven very useful for troubleshooting.
For example, a client noticed that their contact-us forms were no longer being tracked:
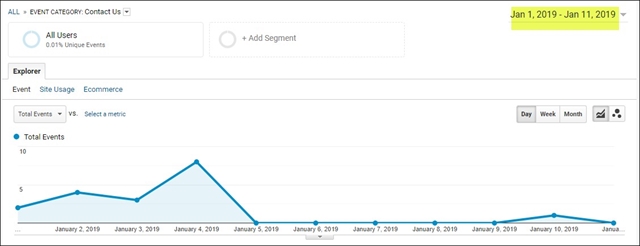
Looking in GA and adding my handy-dandy “GTM Container and Version ID” custom dimension, I saw that GTM container versions 52 and 53 had been working.
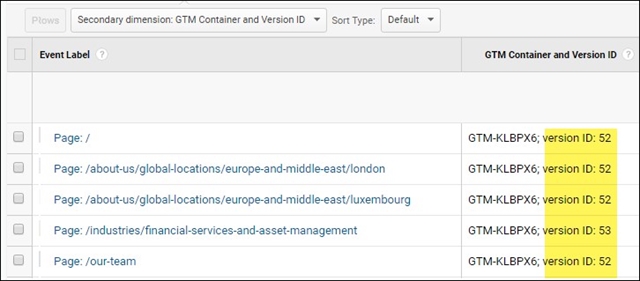
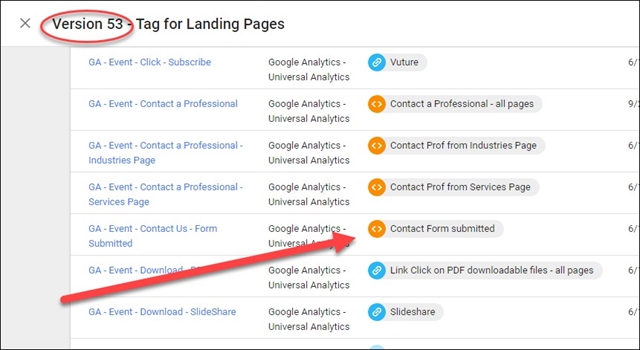
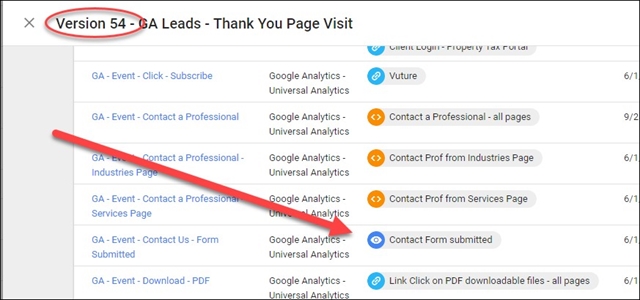
Had anything changed between version 53 and later versions? Indeed it had: The trigger for the Contact Us tag had changed from a custom event (version 53) to a pageview (version 54).
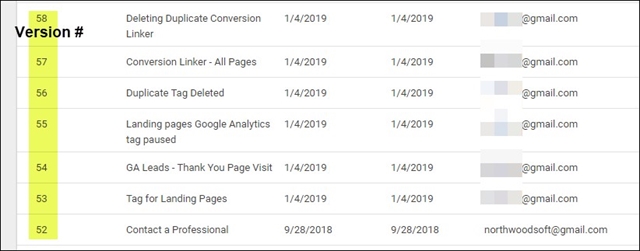
The version history showed that someone had made a bunch of changes and published a number of versions in a very short time.
I would have found the issue eventually and figured out what had happened. But storing the GTM Container ID as a custom dimension sped the process.
Pro Tip 4 – Page Path versus Page URL - Which URL variable to use?
Great GA/GTM practitioners customize GA accounts through smart use of GA Events. I create many events that include the page users were on when they interacted with the website and fired the event.
The Variables section of GTM shows three “page” options. Which URL variable should you use?
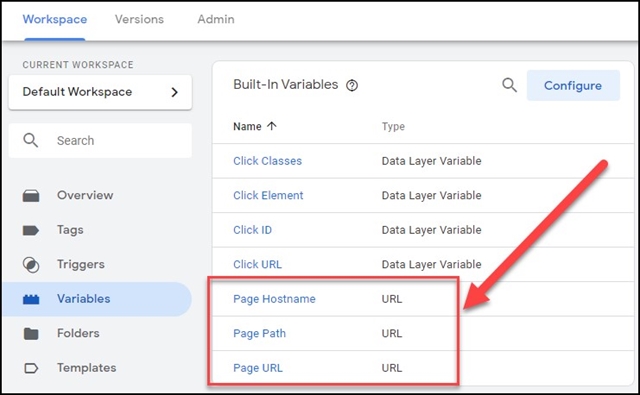
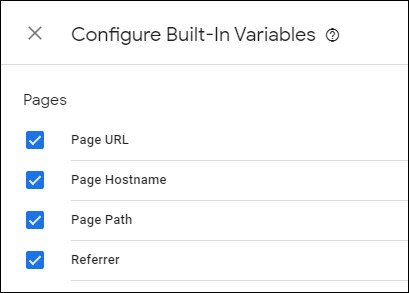
(Note: if you don’t see these, choose the Configure option and make sure they’re checked:)
Once checked, these variables will self-populate as visitors go through your site. For example, in this portion of a GTM Preview screen, you can see what URL variables look like:
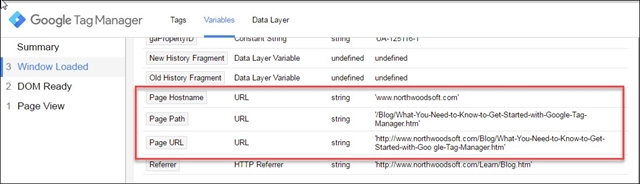
In most cases, Page Hostname + Page Path = Page URL. So should you just use the Page URL?
The answer is no, because of Query Parameters that Google Ads, Facebook, and a host of other sources can add to URLs. For example, Google Ads appends a “gclid” (Google click identifier) to the URL. You can see it here, in the Events / Labels report from Google Analytics – instead of one page you have many:
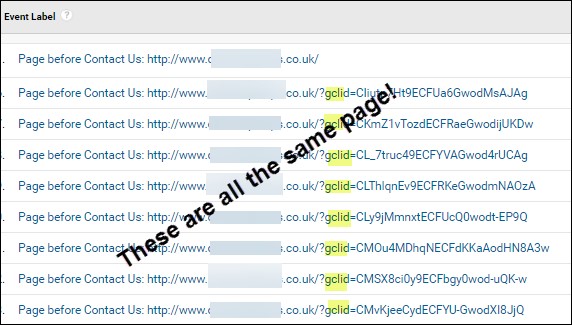
These are all the same page. They look different because I’m capturing Page URLs in my event, so I’m also capturing the gclids.
That’s probably not what I want – I’d really like to have just the URL. So – instead of using {{Page URL}}, I’ll build it using {{Page Hostname}}{{Page Path}}. (Note: the double-curly brackets in GTM specify a variable, like the ones shown at the top of this section.)
If you’re not crossing subdomains, you could instead use just the {{Page Path}} - the portion of the URL after the slash in www.yourwebsite.com/.
Pro Tip 5 – Use the dataLayer instead of screen scraping
GTM can easily grab information from the screen. If you have the correct variables, you will know the page URL, the URL of a link, the link text, etc.
You might think you should use that information directly in the events that you create.
For example, you may want to create an event any time somebody successfully submits a contact form and gets to the “thank-you.htm” page. Easy peasy. Create a trigger that looks for the {{Page Path}} that contains “thank-you.htm”.
However, that “screen-scraping” you just did, where you are specifically looking for information that is on the screen and then reacting to it, is a long-term maintenance nightmare. At some point, somebody will change the contact form and decide to drop the hyphen and call the following page “thankyou.htm.” I can’t tell you how many times I’ve run into this.
Sometimes you don’t have a choice but to screen scrape. But whenever possible, ask your developer to push a notification to the data layer.
What the heck? Without getting too technical (and because a ton of super-detailed articles have already explained the data layer – e.g. here), think of the data layer as a place to store variables or information.
Rather than read things from the screen, have your developer put a tiny bit of code into the datalayer that says the form was submitted. For example:
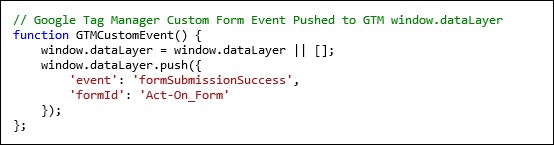
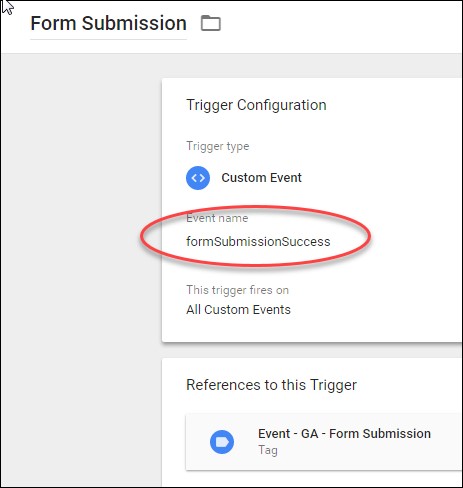
Once that’s created, you can create a trigger that “listens” for that “formSubmissionSuccess”:
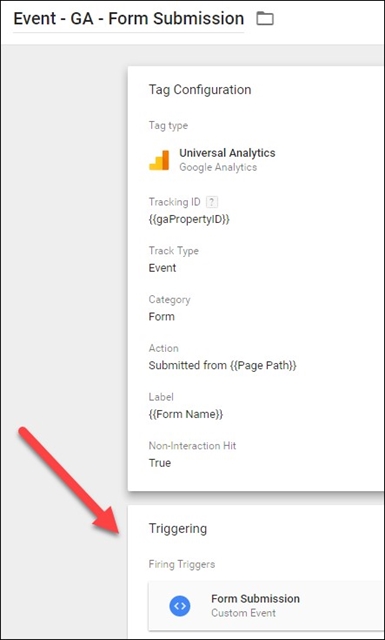
And once the trigger fires, I can create a GA event to capture the fact that somebody filled out the form:
Once you’re relying on the datalayer, as opposed to screen scraping, your events are impervious to changes that people make to link names, page names, etc.
This may sound complicated, but it’s super-easy for a developer to implement and you will always be grateful. Bring them cookies. The kind people eat.
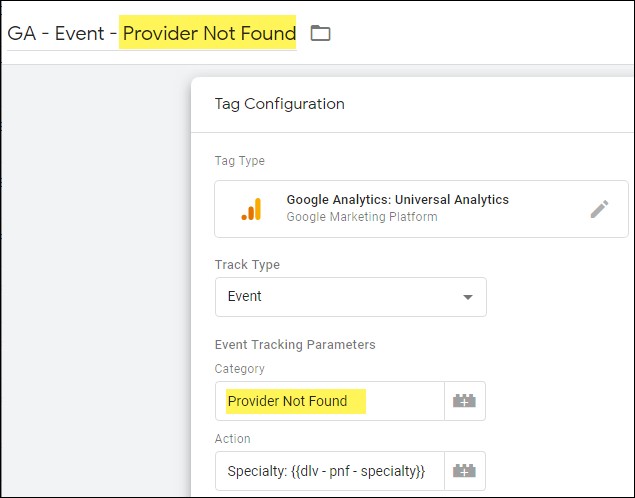
Pro Tip 6 – Naming your GTM “GA Event” tags
Again, to me, events are the heart and soul of a great Google Analytics installation. Track the most significant user interactions on your website through GA Events in order to customize GA to your specific website and thus get the most value out of GA.
For ease of use and long-term maintenance, I label my events in GTM exactly as they will show up in GA. That way, if I see an event category or action in GA, I can easily find the corresponding tag in GTM.
For example, if I look at my Event Category report in GA (Behavior / Events / Top Events), I might see something like this, where I have Event Categories of Outbound Links, etc.:
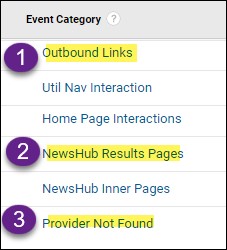
In GTM, I can easily find the tag that created that event because I’m using the exact wording of the Event Category (and sometimes the Event Action) in the name of the tag.
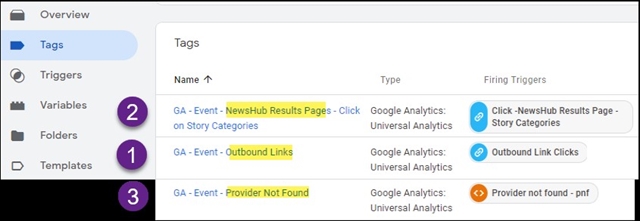
Things to note about the titles of each of these tags:
- I prefix all my events with “GA – Event” so they all group together.
- I append the Event Category exactly as it shows up in GA. That is, I match the title of the tag to the category in the tag.
You can’t always label your GTM tags like this; sometimes your developers or your EEC implementation may push an event that has a dynamically-replaced category name. But when you can control tag naming, you can save a lot of time you would have spent trying to figure which GTM tag drives which GA event.
Pro Tip 7 – Chrome Extensions make your life easier
You could get through life as a GTM practitioner without Chrome extensions – but oh, what a miserable life that would be! I use several Chrome Extension tools. I couldn’t live without these:
7.1 - dataLayer Inspector+ from Adswerve
Man, I love this extension. It sends and decodes all GA/GTM-related traffic to the developer’s console, where you can examine it at your leisure. Want to see what information is being sent to GA as a pageview, timing, event, or e-commerce transaction? It’s all here.
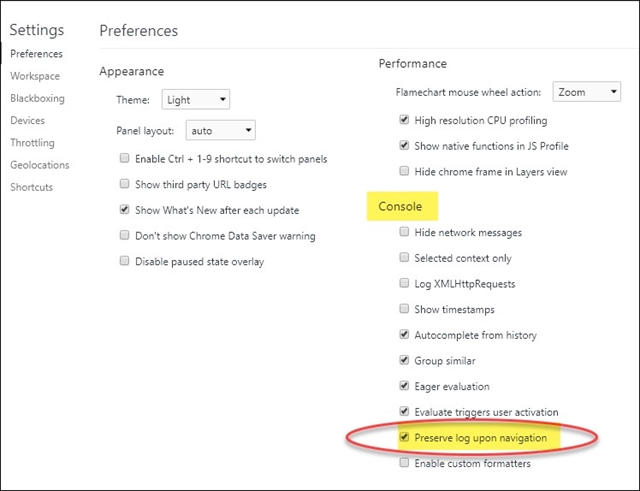
Super-secret pro tip – in the Developer’s console settings, enable the “Preserve Log Upon Navigation“ option in the Console section. This allows you to scroll back through the GA/GTM data. Otherwise, all that great information disappears when a new page reloads.
(H/T to Charles Farina for first introducing me to this great extension.)
7.2 – GTM/GA Debug
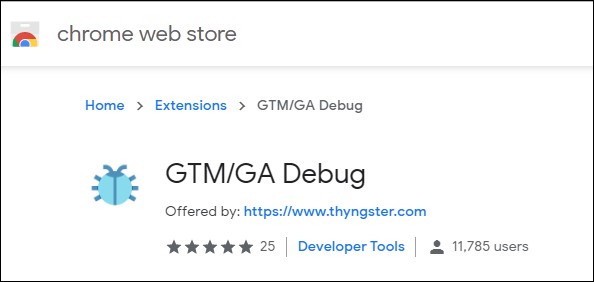
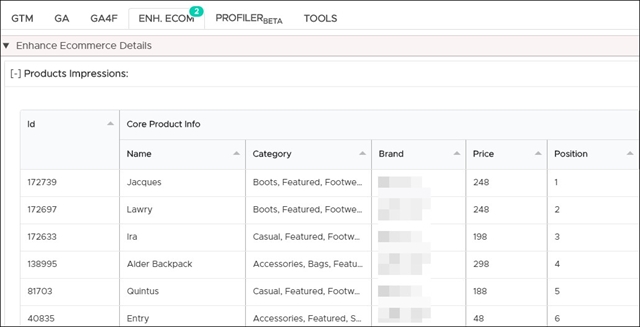
This wonderful extension comes from David Vallejo, a Spanish guru of all things GA/GTM and an avid hiker and cyclist. Like dataLayer Inspector+, it reports on all GA/GTM traffic. But it breaks the traffic out into easy-to-understand tables and sections. I particularly like the way it displays EEC (enhanced ecommerce) transactions.
David is always tinkering with and improving the product. If you want to keep up with his changes (and find out lots about bike races in Spain), follow David on Twitter - @thyng.
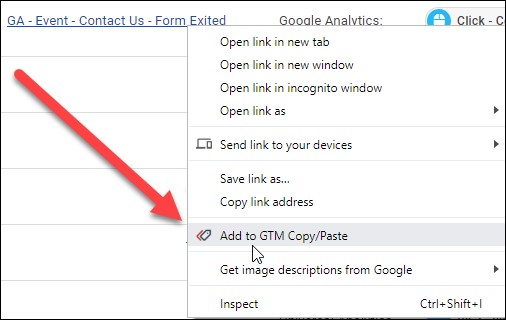
7.3 – GTM Copy Paste

This awesome extension comes from Julian Juenemann at Measure School. Want to copy some tags, triggers, or variables from one GTM container to another? Julian made a tool for that.
Right-click on what you want to copy, add it to your copy list, and then go to the new container to paste it. So easy. So useful.
Pro Tip 8 – Documentation is your friend
In GTM, you can add notes to everything you do – tags, triggers, variables, and version numbers. I love that.
You need not document everything, but I make it a habit to document each version I publish and to document each great change I learned from a blog.
8.1 - Version Notes
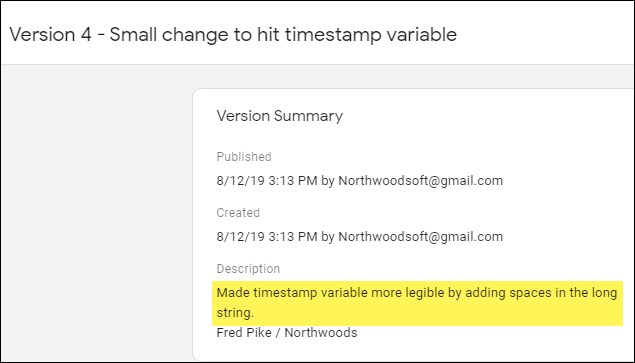
A tiny change to your GTM container sometimes calls for no more than tiny documentation. For example:
Usually, though, it’s best to be more thorough:
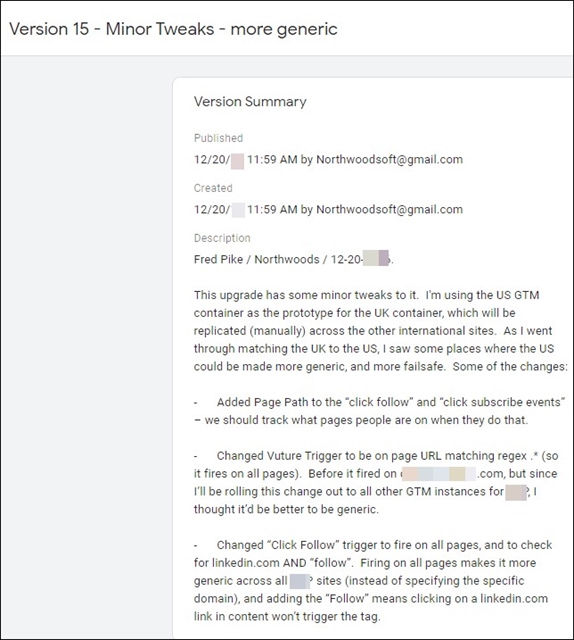
The client doesn’t care about this level of detail. But I do. And so will the person who maintains the GTM after me. Six months after you publish a new version of GTM, you won’t remember what you did or why you did it. Great documentation will remember for you.
8.2 – Document where you got your solution
Whenever most of us run into GTM issues, we search Google and, if we’re lucky, find a solution. Great; fabulous GTM resources abound.
But a month from now, will you remember where you found the solution to your issue?
When I borrow something from a blog post or class, I try to document the source:
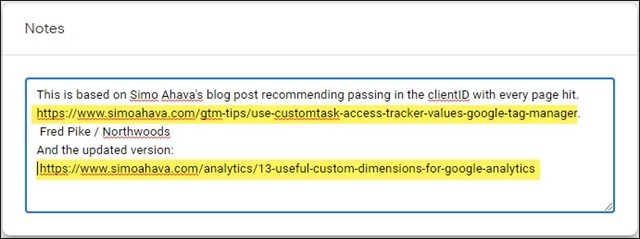
I will either add this in the version notes or, more often, in a notes field for the relevant tag, trigger, or variable.
GTM has notes fields for all aspects. Use them. I guarantee that documenting what you’re doing and why you’re doing it will save your butt sometime, mostly likely when you’re trying something tricky.
The documentation feature might seem like a small thing, but it’s part of what makes GTM such a powerful tool.
Bonus Tip - Use the GTM Container ID when searching
If you’ve read this far, you deserve an extra tip!
This tip helps if you work in and have access to many GTM containers.
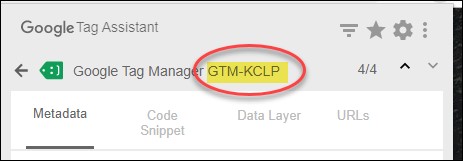
Believe it or not, it can be hard to be sure you’re in the right container. Just to be double-sure, I go to the website whose container I’ll be changing and open the Google Tag Assistant to copy the container ID.
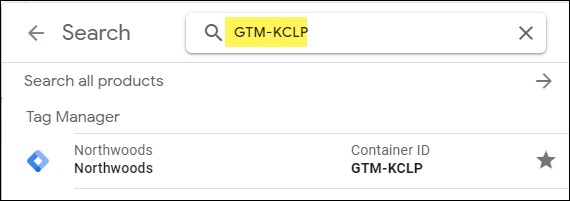
Next, in the GTM search bar, I’ll paste the container ID I just copied. Voilà – up comes the guaranteed right container!
This may seem like a simple and maybe even useless tip – but it’s a great way to guarantee the changes you are about to make are in the right container!
(Don’t have Google Tag Assistant? Follow this link to get it.)
There you have it: Eight pro tips to help you become a better GTM practitioner.
If you have questions, feel free to reach out to me or any member of the Northwoods digital marketing team.
To explore further on your own, here are some great people and resources you should follow:
Simo Ahava – Very deep and detailed blog on GTM. Overwhelming if you’re brand new, but a life-saver once you have some familiarity. One of his posts that I use all the time is 10 useful CSS selectors. (Pro Tip #9! You’re welcome.)
Julius Fedorovicius - Julius knows his stuff inside and out, runs a super-helpful Facebook GTM group, and has detailed blogs. I highly recommend his beginner’s and intermediate GTM courses.
Jeff Sauer - Another giant in the field of GA and GTM and one of the nicest guys I know. His courses on GA, GTM, Google Ads, and Google Data Studio are world class.
Digital Analytics Power Hour – An irreverent and informative podcast on all things related to web analytics. Not specific to GTM, but great to listen to if you’re a digital analytics practitioner.
Need to Optimize Your GA4 Set-Up? Visit Our GA4 Hub for Ideas and Assistance.
Want to become a better GTM practitioner? Get 8 proven tips from our #TagManager pro to improve your efficiency – and sanity! @northwoods http://bit.ly/2lG2Krd